Tutorial proposed by a German customer, advised and accompanied by one of our distributors.
Renovation of damaged woodwork with epoxy resin
A veranda and a new projection
1. History and damage
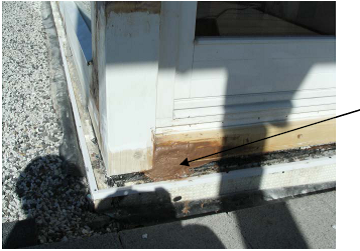
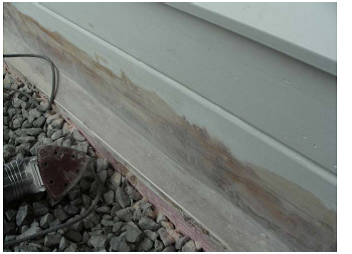
The prefabricated bungalow we built in 2006 showed significant damage to the veranda sill beams and the corner projection in 2012. A commissioned expert established the causes: The black waterproof barrier film, also visible in the photos - which was supposed to protect the wood - is only stapled and not glued; it is therefore not installed in a waterproof manner. In addition, it stops where the edge of the metal cornices under the woodwork also stops. Rainwater from above could therefore penetrate this gap for years; it was actually sucked in by the capillary forces between the film and the wood, but could not evaporate. The inevitable consequence was continuous moisture in the wood. Two areas proved to be particularly damaged:
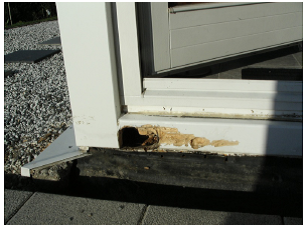 |
a) Sill beam under the terrace door On the left, the wood is wet and worm-eaten throughout; the plank below is also affected. The completely worm-eaten and moldy parts were removed with a wire brush mounted on a drill.
|
|
|
|
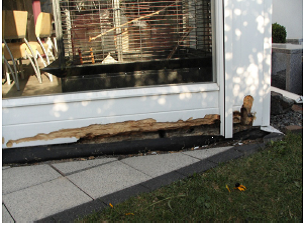 |
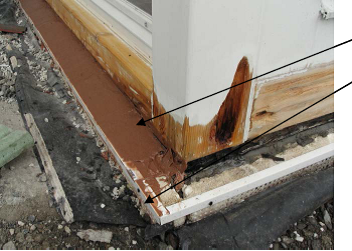
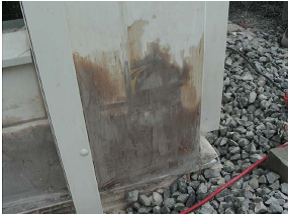
b) Middle of the projection to the outer tip The moisture damage extends to the sill beam, to the right vertical punch and to the plank below. Here too, some of the wood is completely worm-eaten and damaged over the entire depth.
|
|
|
Other minor, but sometimes quite deep, defects were revealed during the renovation. Almost everywhere, the planks under the veranda and the overhang were affected; the cause here was obviously the same. Despite the extent of the damage, the expert could not find any static problems, but recommended a quick renovation, in particular a quick removal of the film.
2. How to repair the damage?
To repair the damage, there are two fundamentally different solutions: Replacing the woodwork (recommended by the expert and already done by the house builder the previous year on another job) or filling in the damaged areas. Because of their location, replacing the woodwork is not easily done, nor is it the most financially favorable solution. Since our builder refused to carry out the renovation because of the expired warranty period (or did not even reply to our letter to that effect), we, as the owner, had to make a decision and carry out the work ourselves, even though we were not familiar with the subject.
Through internet research, Michael Thon's work drew our attention to the advantages of epoxy resins. After reading many forums, we contacted Time Out Composite OHG by phone. They immediately took our problem into consideration, asked us for pictures of the damage and gave us detailed advice. We would like to thank them for this, as well as for the quick delivery of the materials.
3. Get to work!
Thus, we began the repair work in July 2013, in warm weather, on our own, with the following steps:
- The damaged areas - which had been completely dried out in the meantime (checked with a measuring instrument) - were milled and cleaned. On the advice of Michael Thon, the slightly damaged woodwork was not removed so that the epoxy resin could penetrate the wood fibers and form a "wood-resin composite".
- The old white paint was sanded off along the entire length of the beam - even in the untouched areas - so that the 15 cm close to the floor could then be completely sealed with epoxy resin (protection against splashes, etc.).
- The drainage around the projection and the veranda was improved. There was no standing water before, the main cause was rainwater running off the windows and frames, but we wanted to play it safe; furthermore, the extra cost was limited as the gravel and terrace tiles had to be removed for accessibility.
- The damaged areas were then treated with a mixture of SR 5550 resin / SD 5503 hardener (100:29 in our case), applied by brush. As soon as the mixture was absorbed and somewhat set, a second and then a third coat was applied ("wet-on-wet application"). Depending on the size of the damaged areas, the most suitable mixes were 100 or 200 ml. They did not cause any problems over time and were applied without residue.
- Next, the brush-treated holes in the wood were filled with a relatively strong and pasty resin-hardener filler, Woodfill 250. Woodfill 250 proved to be more suitable for this purpose than the sawdust used in the test; the sawdust does not apply well and causes problems during smoothing and sanding.
- We decided to remove the cause of the problem entirely: instead of the waterproof film and metal ledges, the base below the wooden beams, i.e. the 5 cm from the floor plate above the supporting plank to the newly restored beam, was transformed into a sloping base "cast" in epoxy resin. This should make this water-sensitive area completely safe, and the sloped top also allows rainwater to drain away immediately. A drip edge has also been integrated. For this base, as for the fillings above, a large quantity of resin, hardener and Woodfill was required, which led us to place several repeat orders by phone.
- All the pieces were then sanded (almost 5 days of sanding with triangular and belt sanders!), dusted, the residual hollows retouched with for part a new sanding.
- The entire bottom of the pointed projection and veranda was then repainted in three coats (microporous paint and top coat, adhesion tested beforehand).
- The gravel and patio surfaces were finally put back in place.
The following illustrations show the working
 |
The hole in the sill beam under the patio door is filled, however, the resin-hardener mixture has - probably due to the temperature being too high - reacted too quickly, causing the sealant to swell slightly.
|
|
|
|
 |
Mise en forme du socle périphérique avec larmier.
|
|
|
|
 |
Sanding (first with 60 or 80 grit, then 120); then cleaning with a water jet because of the large amount of material removed.
|
|
|
 |
The enormous hole at the level of the projection in point closes...
|
|
|
|
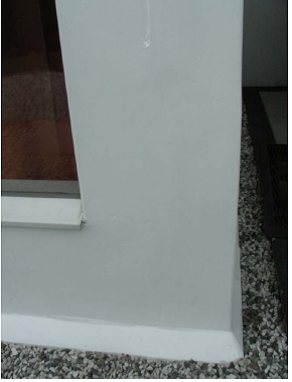 |
...the result once painted.
|
|
|
4. Problems
The work shown always raises new problems, especially when trying a process for the first time:
- It is difficult to spatulate large damaged surfaces perfectly flat, especially when the edge of the beam below, which gives the height reference, is also worm-eaten. The low-angled light of the evening comes - at the latest - to highlight the irregularities of the surfaces.
- Connections (e.g. vertical to base) are almost impossible to sand straight across the beam by eye with amateur tools, unless you are willing to spend a lot of time on it. The hand shaping is always visible.
- Even with all due care, mixing cannot be done without bubbles forming. Therefore, sanding always reveals small holes that are probably caused by small bubbles.
5. Result and appearance
All in all, the work was not difficult to carry out; it was described in detail by phone or on the Internet, but it required patience and in our case took about two weeks, which is also due to the size of this project. The sanding work in particular should not be underestimated in terms of time and effort. Despite masking the floor with newspaper, it is not possible to avoid dirt, e.g. on the terrace tiles.
The most important result is without doubt the presumed sealing against rainwater. The entire base area is now regularly and tightly sealed. However, residual moisture can evaporate upwards - over the surrounding epoxy strip - or towards the interior of the house. The base area also looks better now than it did in the past, when the screwed-in metal window sills always looked like an improvised emergency solution. That the improvements were not made by a professional can be seen in some places (compare with above): not everything is perfectly flat, the connection to the shaped sloping base is not of equal height, but overall this is not too noticeable and does not interfere.
It is planned to keep the veranda and the corner projection under close surveillance for the next two years, to measure them with a moisture meter, to fill in any cracks and, if necessary, to take a few core holes in the beams to inspect the interior of the wood. Only then will it be possible to see if the renovation has brought a lasting solution to the original problem. But we are optimistic about this and will be sure to report back!
Nachrodt-Wiblingwerde, 18.08.2013
Application area related to this tutorial:


